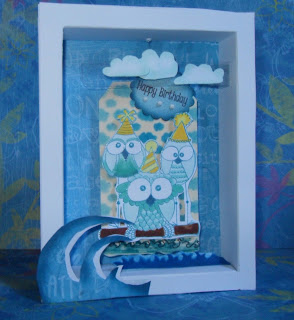
Hello Peggy here and welcome to my studio where I am creating
birthday wishes with a tag and shadow box made of paper.
Today's supplies include:
Clear Embossing Powder
Blue Distress Ink
Spectrum Noir Markers
Alcohol Ink
White Cardstock
Patterned Paper
Scissors
Double Sided Tape
Recycled Acetate
Memento Black Ink
Embossing Machine / DieSmall piece of fishing line
I began with my focal image by stamping with blue distress ink and embossing the image. I find it easier to color inside the lines with alcohol markers. I colored my image with CT1, CT4 , BT1, BT4, BT9 Spectrum Noir Markers. For the piece of wood they are balancing on in the ocean I colored with TN7, TN8 and GB10.
Listed here are some things you can spray and their dilution ratio's.
I made some alcohol sprays by using a Copic Colorless Blender which is 70% alcohol mixed with alcohol inks to make it go farther. I sprayed my cloud stencil from Latina Crafter with my custom alcohol inks in my siphon cup to make my cloud background on a standard 4 3/4 x 2 3/8 shipping tag.
Above you can see the bones of the shadow box. I started with a 5" x 6 1/2" card base that I cut in half. I used one half for the frame and the other for the back of the shadow box. With another piece of white card stock I made 4- 2" strips scored at a 1/2" on the sides and folded with 1" left in the middle. With double sided tape I put the sides on the shadow box base and taped the frame on top. Next my embellishments were created by hand and by stamping a
grass stamp by Latina Crafter and I used them as waves.
I shaded my hand cut clouds (white card stock) and hand cut waves (patterned paper) with my
eBrush and Siphon Adapter. I used a recycled piece of packaging made of acetate to hold the clouds in seemingly in mid air by taping it to the side of the shadow box.
I stamped a sentiment with Memento Black Ink on white card stock and ran the sentiment through my embossing machine to cut it out with a small die. I then used my eBrush with an alcohol solution and eBrush Siphon Adapter to spray making it compliment my background. I placed three brads under the sentiment just to make it stand out more and to tie in the white of the Owls and background.
My tag with the cutest Owls from Latina Crafter is hung from the top of the shadow box with fishing line so the tag swings from side to side as if the ocean is a little rough. I hand cut the waves and used a second cut wave to place behind the first to make the wave more defined.
Here it is from the sides. I could see making this a little smaller in the middle and closing up the sides and top for a hidden place for candy.. hmmm...
I hope you have enjoyed today's tutorial and I hope you check out some of my links above. The possibilities are endless for this adapter. I can't wait to get into the kitchen!.