
Hello and Happy Hallows Eve!
I had so much fun making this, I can't believe how easy it is to mold this clay
and how fast it dried.
I was able to paint my clay the next day.
I did this process in stages to let the clay dry.

I experimented with different coloring mediums, here I used a black copic marker,
however, I did find my clay to be porous and retouched with black acrylic paint.
At this stage I stopped to make additional pieces.
however, I did find my clay to be porous and retouched with black acrylic paint.
At this stage I stopped to make additional pieces.

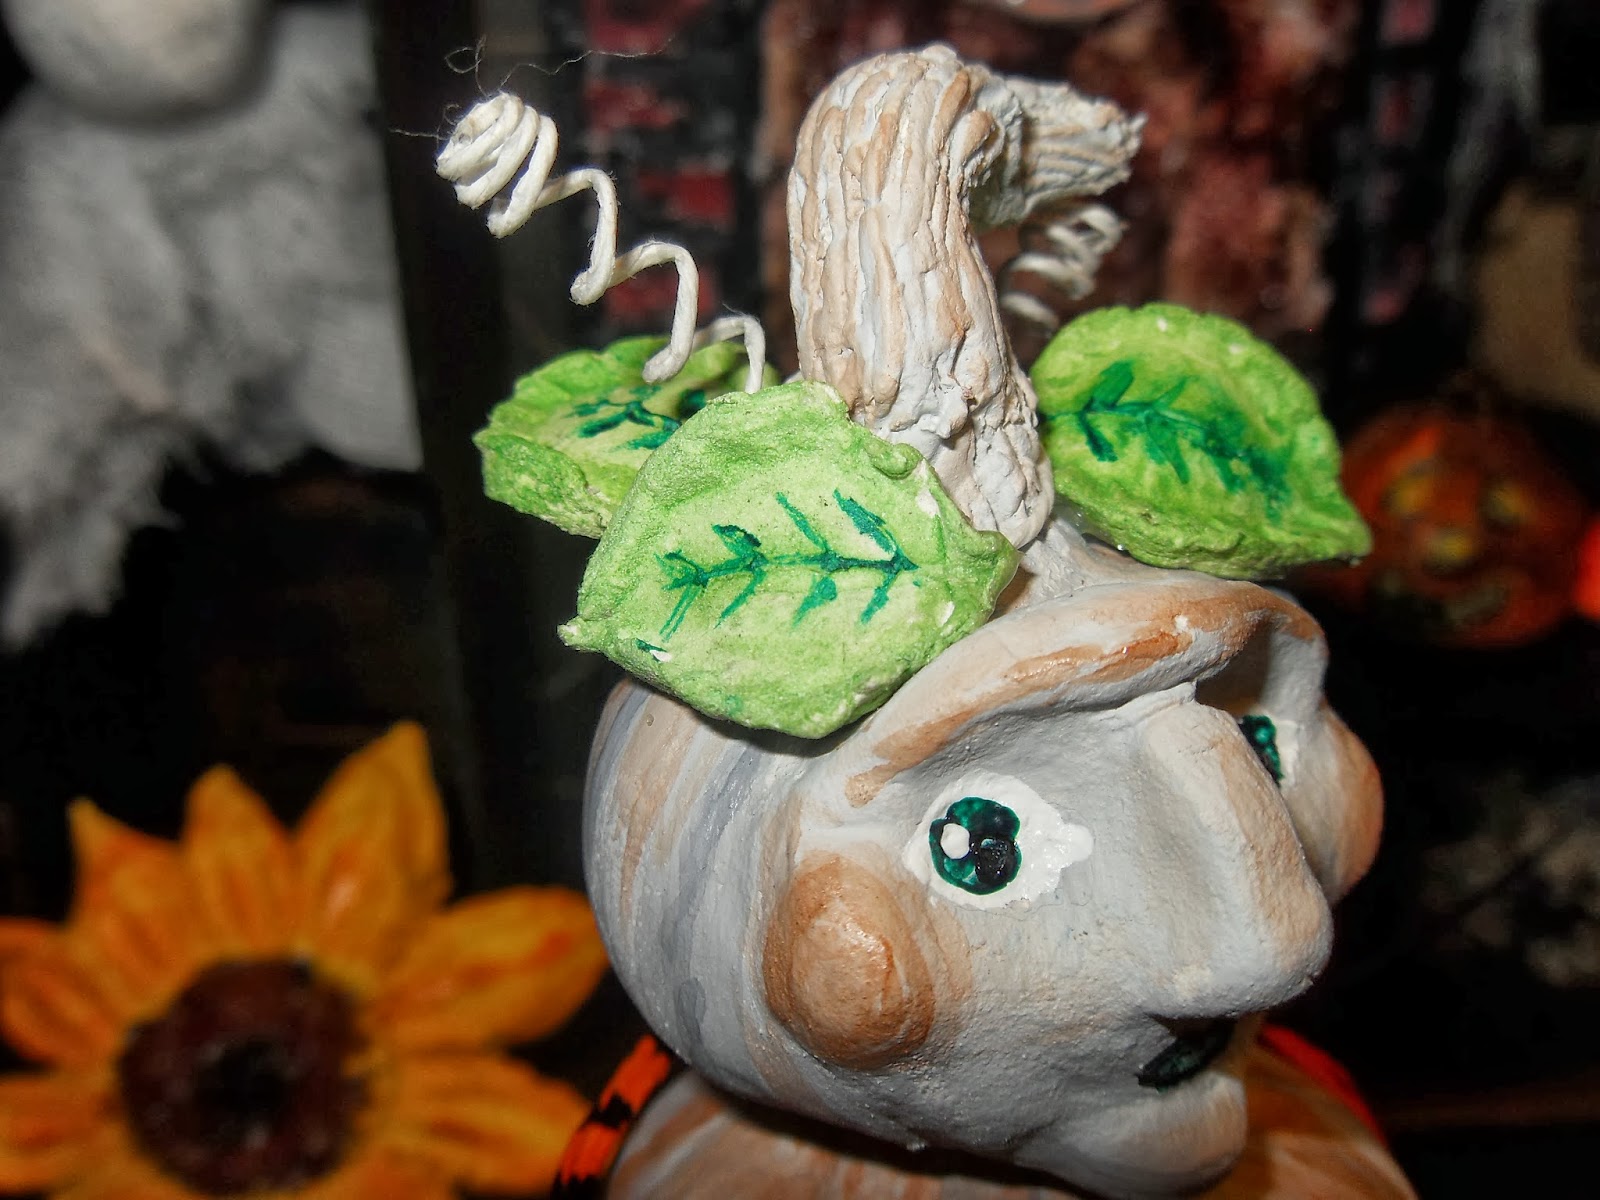
Next I started with my pumpkin man and instead of using solid balls I used tin foil rolled up in a ball and covered my tinfoil with clay. This method saved me some clay. Again I used skewers to attach the head to the body. When I was forming his head I used smaller balls of clay to attach to his face to form cheek bones, nose,chin and brow. I used wet fingers to make it look like all one piece and smoothed edges. I put this aside to dry

Next I created two eyeballs for my black kitty and one for my door.
After I painted them I assembled my kitty and glued her together.
I couldn't quite get the mouth right with paints so I drew one out and cut and pasted it on my kitty.

Here I made a little bat and let him dry before painting.


Setting this aside to dry I went on to make his leaves for the top of his head with
stamped images into the clay. I trimmed around the images and let them dry.

Here I started on the sunflower. I flattened out a piece of clay onto an acrylic block. I took my hook tool and dragged into the clay the shape of the flower and picked at the middle to make texture. Then I cut out the edges with a spatula and let it dry.


Next I decided to make some molding paste out of the paper clay.
I spritzed water into the clay to make a muddy paste blending it with a spatula .

So I used a stencil from Crafters Workshop and applied my Paper Clay paste.

It worked like a charm! I dried it with my heat tool and I was ready to paint. I decided to try out some Distress Inks (aged mahogany and black soot). I placed some ink on my Teflon Craft sheet and spritzed some water on it and painted with a water brush.

I set that aside to dry and started to paint my sunflower with acrylic artist paints.
I also added water to my yellow paint to give it a transparent look.

I set that aside to dry and started working on my "witch who hit the pole".
I rolled a ball for her head and knowing I was going to cover up her body I roughly shaped her so she could wrap around a pole. Again I used a skewer to attach her head to her body and used them for legs. I molded out a hat and set them aside to dry.
I rolled a ball for her head and knowing I was going to cover up her body I roughly shaped her so she could wrap around a pole. Again I used a skewer to attach her head to her body and used them for legs. I molded out a hat and set them aside to dry.

I used a skewer for her broom stick and paper clay for the bristles
I scratched in the markings for the bristles.

Then I assembled her.
I set her aside to dry and when dry painted her with acrylic black paint.
I used eyelash ribbon for her hair and felt for her cloak after she dried.

Here is my sunflower after being painted with acrylic paints.

Here is my pumpkin person with the leaves made earlier and painted with acrylic paints.
I also colored the floral wire with copic markers.

I had one small piece of clay left that I rolled into a ball and covered with
a medical (gauze) cloth to produce my version of a ghost.
I did add lights to the scene but hard to capture in the dark. This was so much fun!


Here is my finished piece! My witch hit the pole and everyone took the stage!


My eyeball was painted with acrylic paints and glazed over with Sakura Crystal lacquer.


I hope you enjoyed this fun DT submission as much as I enjoyed creating it!
I felt like a kid again and how easy it was!

I just love your whole Halloween scene!! Very imaginative!
ReplyDeleteWow, Peggy, you made so many wonderful pieces. I love the little doll!
ReplyDeleteAMAZING....
ReplyDeleteso pretty - love the details and careful attention to the smallest bits and bobs! And I LOVE the sunflower! Brava!
ReplyDeleteI didn't realize there was so much PaperClay in your project until reading your post. You are really talented with the stuff - awesome! :-)
ReplyDeleteWonderful detail! Love the pumpkin guy, great job!
ReplyDeleteThat little pumpkin man is just adorable.
ReplyDeleteThe pumpkin man is my favorite part! So cute! :)
ReplyDeleteWow!! I love all the elements,,very fun!
ReplyDeleteThis is really awesome! Love all the details. The witch running into the pole is cute, and love the adorable pumpkin!
ReplyDeleteI am a big fan of shadowbox dioramas this is spectacular! <3
ReplyDeleteThank you everyone for the comments, I had so much fun I can't wait to do more!!
ReplyDeleteThis is so fun and SO detailed.
ReplyDeletevery magical.
~Diane
So many details! just wonderful...and amazing!
ReplyDelete