25.4.14

Sin City Stamps Stencils


Hello Peggy here to show you how I used Sin City Stamps Stencils to create this 12x12 layout. 
My daughter loves Marilyn Monroe I decided to make her a layout honoring her favorite icon. 

List of items used today are: 


I started with my stenciling on designer paper that had a few flowers to begin with. 
I used Gelatos and Pan Pastels to color my stencil


After coloring I fussy cut the roses out. I pasted them to my second designer Paper.

 I added background stamps as well as molding paste for texture

 I placed my pictures and glued everything down.
I hope you enjoyed todays stencil layout. You can find stencils , stamps and more at Sin City Stamps Store.

Have a Great Weekend
<a href="http://www.bloglovin.com/blog/6119081/?claim=ty7mu44t22y">Follow my blog with Bloglovin</a>
Peggy Oliver, My Stamping Obsession

19.4.14

Hello! Peggy here to show you how I made this flower art frame with some fantastic products from the Arnold Grummer's Website.

List of supplies I used today are: 
  • Blank frame 
  • White Gesso
  • Egg Whites
  • Paint Brush
  • Specialty Paper #9050
  • MicroFleur Flower Press
  • Flowers and Leaves


First thing I did was find some pretty flower specimens to press. This process is so addicting...I can't wait until all the flowers bloom! 
I placed them in my press and microwaved them for 45 seconds on high. Leaves and thin flowers dried faster than stems and thicker flowers. But the whole process took no more than a few minutes to dry All of the flowers and leaves.
Here they are pressed and dried.

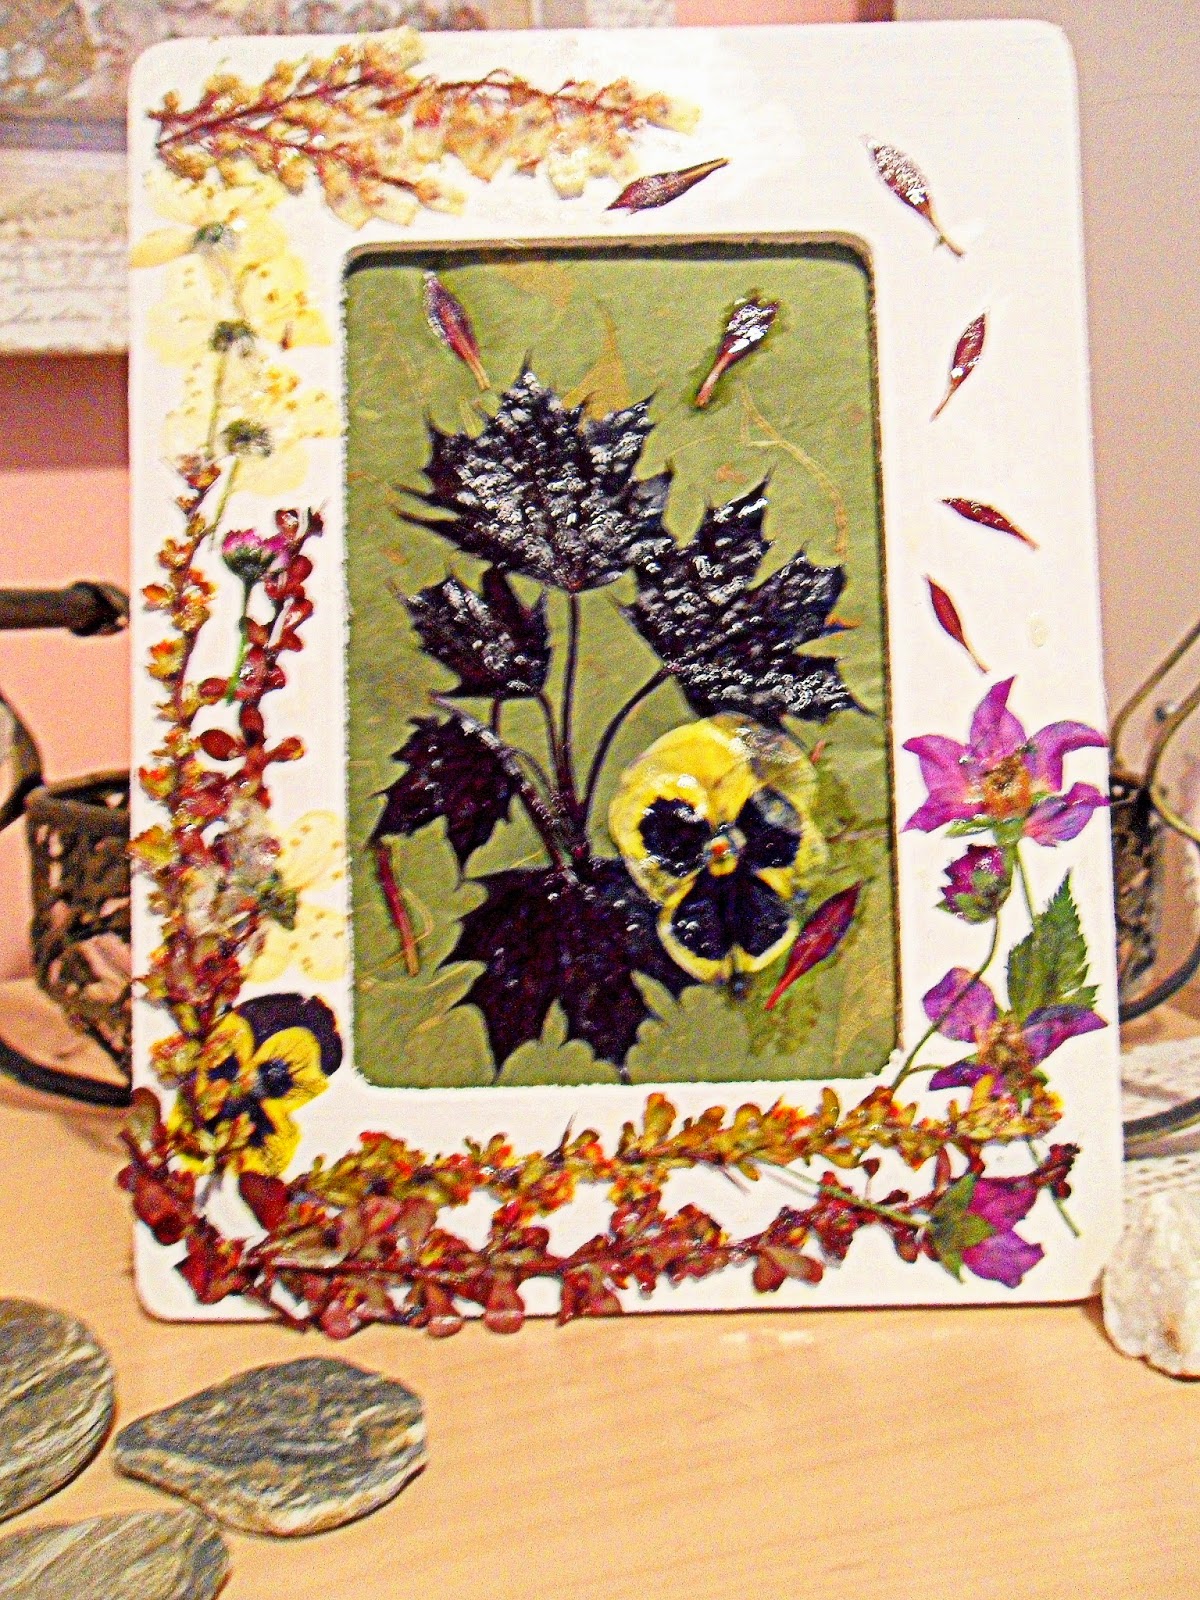
This is my blank frame I used two coats of white gesso.
Here is where the egg whites come in.. Yep.. you heard right Egg Whites are used here to preserve the color of the flowers and to glue them down. Mother natures glue! I read this on the internet and I Had to try it!.
Apparently they will keep their color for years! And give them a glossy shine..
I used some specialty paper from an A La Carte package, it has leaves embedded into the paper. I used the backing that came with the frame and placed my paper behind the frame. This way my recipient can easily take the backing off and use it as a regular frame. I then used my egg whites and glued and preserved my pieces.

Here is a close up of a dried egg white wash over the flower. As you can see it keeps its gloss..

I hope you have enjoyed this tutorial and inspired you to try something new!
You can save 20% off when placing your order this month by using this code: MOM20 at checkout.
 Arnold Grummer's Website.


11.4.14

Sin City Stamps Light Switch Plate

Hi, Peggy here to show you how I produced this faceplate with Sin City Stamps!
Materials used today are: 
  • Sin City Stamps
  • Golden Molding Paste
  • Stencils (hexagon and circles)
  • Stazon Ink (black)
  • Distress Ink (Walnut Stain)
  • Water Mister
  • Heat Tool (Speed up drying time)
  • Gear Embellishments
  • E6000 Glue
  • Blank light switch plate
I started by sealing my raw wood plate with a coat of white gesso. I made some texture with Golden Molding Paste and Stencils.
Below shows how I used a Machine Man Unmounted Steampunk Stamp. I only used parts of the stamp with Stazon Black ink and rolled them onto my plate. Stazon was an important ink to use as it is permanent ink. I dropped distress ink and let it bleed and sprayed it with water. As I sprayed I could see my stamped images reappear. I had excess distress ink that ran off my project and onto my matt. I made sure to soak up some wrinkled dictionary paper for another project down the line. 


After a first coat of distress ink had dried I wanted it a little darker so more distress ink was needed. What I love is that distress inks are water based and the stazon is permanent, so I never lost my stamped images while darkening. 

 I added my embellishments with E6000 glue and thats it! Here you can see below the paper I used to soak up any extra ink.
I hope you enjoyed my post and encourage you to come out and see the Sin City Stamps Store for Stamps, Chipboard, Die Cuts, Stencils and more!..


5.4.14

Flower Album for Mum


Hello, Peggy here to show you how much fun I had with Arnold Grummer's Microfleur 
Flower Press and Molds.


Items I used today are:
Arnold Grummer's Microfleur Flower Press
Arnold Grummer's Books a la carte #9050
Accordion Fold Book
Arnold Grummer's Molds Mini Bugs
Polymer Clay
Copic Markers
Gelato's
Molding Paste
Matte Medium
Stencils
Double Sided Tape
Drywall Tape
Metal Tape
Gold Acrylic Paint
 I placed my flowers and leaves inside the press and microwaved according to the directions. They came out perfectly and might I add very addicting! 
 I prepared my accordion photo album by inking the edges with my copic markers.  

 I used double sided tape to adhere each of my imported botanical sheets from the kit to the album.

 I made some paper flowers and ribbon with the botanical sheets.
 I used metal tape to the back of the ribbon strength. For a background I used Golden molding paste with a homemade stencil and colored with perfect pearls and gold acrylic paint. I used drywall tape for texture. 

  I glued each flower on a page with Golden Matte Medium and tried to make each one visually pleasing to the eye. I brought each page together with drywall tape that I colored gold. I made four mold casts out of Polymer Clay and baked as per the directions on the clay packaging. I painted each bug with Faber Castell Gelatos and topped with gold acrylic paint.


I hope you enjoyed my tutorial and if you use this code MOM20 you can receive

 20% off your order an the Arnold Grummer Store!

Have a Great Day Peggy Oliver