Showing posts with label Latina Crafter. Show all posts

20.6.16

I love you because card with Latina Crafters


 Happy Monday! Peggy here and I would like to show you a card made with my eBrush by Craftwell USA and our sponsor this month Latina Crafters!
This is a large card. I took a 8 1/2 x 11 sheet of cardstock and folded it in half.  I chose a stencil from Latina Crafters to encircle my focal image on the front.  Using my eBrush I sprayed onto photo paper with a metallic marker.  Using this paper gave me the shine I was going for.  Next I embossed my inside sentiments with Latina Crafter Stamps in Gold embossing powder and I cut them out for placement onto the inside of my card.  I cut out a film strip to place my photo's inside and I continued the same stencil pattern on the top of my film strip spraying with my eBrush. 
I put it all together! 
DAD I love you because
You're the funniest man I know!
and 
You tickle me and make me giggle!
Sending you buckets of Love xxxooo

Have a great week!!

13.7.15

Personalized Child Room Decor on Canvas

Hello! Peggy here to show you how I made this personalized wall piece. 
We are partnering with Latina Crafter this month so I thought I would incorporate their stamps with some clay. 
Today's supplies include: 
Die (optional)
Acrylic Paints
Alcohol Inks
Gold rub and buff
Patterned Paper 
Blue Cardstock
Paint Brush
Canvas
Tape or Matte Medium
Clay
Glue
Cutting Blade

I started with my focal image. I flattened a piece of clay to fit the size of my stamp. I pressed my stamp into my clay to make an impression. Next I used a die to press into my clay and cut around it with and x-acto knife for a nice frame around my image. 

 I also cut some squares and rectangles and stamped the sentiments into the clay with the same method as above. I also used a ruler to make impressions and played with the clay to make embellishments. Next it was time to bake. After baking and fully cooling I chose the pallet of paints I was going to use. Teal, Purple and Pink.
 After I painted everything with Acrylic paints it was time to eBrush my background papers with some stencils from Latina Crafter. I used my siphon with blue alcohol inks to create this background. I sprayed two sheets of light blue Cardstock to fit my canvas and glued them down with matte medium
 
 I placed all my pieces down where I wanted them and proceeded to glue them down to my canvas with E6000 glue. Here is my result. I hope you have enjoyed my tutorial and check out Latina Crafter Stamps and Stencils!


Have a Great Day!!


6.7.15

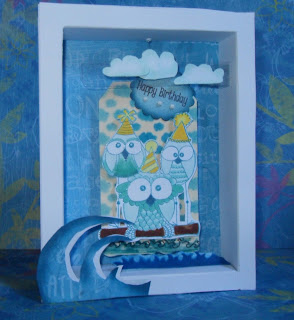
Happy Birthday Shadow Box


Hello Peggy here and welcome to my studio where I am creating
birthday wishes with a tag and shadow box made of paper.
Today's supplies include: 
Clear Embossing Powder
Blue Distress Ink

Spectrum Noir Markers
Alcohol Ink 
White Cardstock
Patterned Paper
Scissors 
Double Sided Tape
Recycled Acetate 
Memento Black Ink
Embossing Machine / DieSmall piece of fishing line


I began with my focal image by stamping with blue distress ink and embossing the image. I find it easier to color inside the lines with alcohol markers. I colored my image with CT1, CT4 , BT1, BT4, BT9 Spectrum Noir Markers. For the piece of wood they are balancing on in the ocean I colored with TN7, TN8 and GB10.

Next I started my background with my Ebrush and the BRAND NEW Siphon Adapter!.
Listed here are some things you can spray and their dilution ratio's.
I made some alcohol sprays by using a Copic Colorless Blender which is 70% alcohol mixed with alcohol inks to make it go farther.  I sprayed my cloud stencil from Latina Crafter with my custom alcohol inks in my siphon cup to make my cloud background on a standard 4 3/4 x 2 3/8 shipping tag. 
 Above you can see the bones of the shadow box. I started with a 5" x 6 1/2" card base that I cut in half. I used one half for the frame and the other for the back of the shadow box.  With another piece of white card stock I made 4- 2" strips scored at a 1/2" on the sides and folded with 1" left in the middle.  With double sided tape I put the sides on the shadow box base and taped the frame on top. Next my embellishments were created by hand and by stamping a grass stamp by Latina Crafter and I used them as waves.
I shaded my hand cut clouds (white card stock) and hand cut waves (patterned paper) with my eBrush and Siphon Adapter. I used a recycled piece of packaging made of acetate to hold the clouds in seemingly in mid air by taping it to the side of the shadow box.
 I stamped a sentiment with Memento Black Ink on white card stock and ran the sentiment through my embossing machine to cut it out with a small die. I then used my eBrush with an alcohol solution and eBrush Siphon Adapter to spray making it compliment my background. I placed three brads under the sentiment just to make it stand out more and to tie in the white of the Owls and background.
 My tag with the cutest Owls from Latina Crafter is hung from the top of the shadow box with fishing line so the tag swings from side to side as if the ocean is a little rough. I hand cut the waves and used a second cut wave to place behind the first to make the wave more defined.
 Here it is from the sides. I could see making this a little smaller in the middle and closing up the sides and top for a hidden place for candy.. hmmm...
I hope you have enjoyed today's tutorial and I hope you check out some of my links above. The possibilities are endless for this adapter. I can't wait to get into the kitchen!.

16.6.15

Latina Crafter Stamps and Stencils!

Hello Peggy here to show you a quick card made with Latina Crafter Stamps and Stencil!
These stamps are so cute I had to make another!  Ahhhh Coffee, the Sea and Me!.

Have a great day!

15.6.15

Latina Crafter Card with eBrush by Craftwell USA

 Hi Guys Peggy here with a quick card.  A big thank you to Latina Crafter for their sponsorship this month.
Supplies used today are:

  • eBrush by Craftwell to make the background image on canvas. 
  • Latina Crafter for my focal image and stencil
  • Spectrum Noir Markers
  • Double Sided Tape
  • Spellbinders Die
  • Pop Dots
  • Ink pad
I started with my focal image she is so cute! I colored her with Spectrum Noir markers. 
I also cut a mask out of the same image so I could cover her up and fill in the sky. 
For the sky I used my eBrush by Craftwell USA with a stencil from Latina Crafter using my Spectrum Noir markers
I cut the image out with a square Spellbinders die and used the piece I cut on the outside to give it dimension as well as pop it up on pop dots.  I stamped my images using memento black ink.

That's about it! I hope you enjoyed my quick card and I hope you have a great day!


11.6.15

Happy Anniversary Latina Crafter!

 Hello!! Today Is the first day of the blog hop for Latina Crafters and we are Celebrating their 4th Anniversary! Congratulations Latina Crafter!!
Here is my blog submission for the hop I hope you enjoy the HOP!

Supplies used today are : 

Have  A Great Day!
This is our line up!!

Latina Crafter's DT


Latina Crafter's **Alumni**


**Craftwell Team** Design Team

Please Join US!!!

8.6.15

Latina Crafter and the Ebrush Siphon Easel Card


Hello Crafty One's!  Today I would like to show you how I made this Owl-dorable easel card. 
Supplies used today are: 
Dies/Scissors
Ink Pad (Versamark)
Alcohol or Blending Solution
Alcohol Ink
Mixed Media Metallic Powders
Embossing Powder
Spectrum Noir Markers
3D Crystal Lacquer 
Paint Brush
Craft Heat Gun
Cardstock
Embellishments
Foam Dots
Double Sided Tape

Our Sponsor this month is Latina Crafter who's fabulously cute stencils and stamps are to die for!

I started with my main stamped image from the "Some Birdies Birthday" line and I stamped with Versamark ink so I could emboss with clear embossing powder mixed with the Mixed Media Metallic Sapphire Blue powder and heat set with my craft heat gun.
I colored my main image with a new product on the market called Mixed Media Metallic Powders. 
I used 3D Crystal Lacquer and mixed it with the powders to create a metallic paint.  I finished coloring the image with Spectrum Noir Markers. 

Gathering my materials to use with my eBrush and Siphon, below you can see
  • my alcohol solution 90% alcohol
  • alcohol ink
both of these were mixed together. I filled the jar that came with my siphon half way and I added about 5-7 drops of blue alcohol ink.
Also pictured below are my siphon adapter from Craftwell USA that fits my eBrush and the Mixed Media Powders. 
Using my siphon and eBrush I sprayed a background on white cardstock using the stencil line from Latina Crafter.  I hate to measure .. I admit it.. So this card size was based on the size of the background stencil.  I built up layers of cardstock starting with my background.  
 After my main image was ready and background sprayed it was time to think about the sentiment.
With the set of stamps was a single line of sentiment which I cut in half and when I applied it to my acrylic block I curved and shaped the stamp half on the top and half on the bottom.
 I used a white piece of card stock for the sentiment which I sprayed with my eBrush, siphon and background stencil to match my background. I used a scalloped die to cut my sentiment out.  Next I  used embossing ink and powder on the edges. I mixed with the Mixed Media powders to create a metallic glossy edge. I stamped my sentiment in Memento Ink.

Then it was time to layer and put it all together. I chose colors to enhance my image. I have three different colors of complimentary card stock. I layered my card top first before making the bottom part of the easel (this predicted the size of my bottom.) I measured a piece of cardstock the same length of my top plus four inches.  I used the extra four inches to make the "A" fold in the easel. I scored twice at two inch intervals. I could then fold on the scored lines and create an  easel and I attached my top card

 To embellish I chose ribbon, buttons and thread. Now for the bottom of the easel I needed a background piece to match and bring in the pattern from the top to the bottom.  I used clear embossing powder mixed with MM powders to create the cloud background. I placed the stencil on the light blue card stock and with my versamark ink pad I pressed onto the stencil creating a water mark of clouds. I spread the mixed embossing powder over the watermark and heat set with my heat tool.  I layered card stock again for the bottom.  Next I needed a place to sign the card so I used a die to cut out a piece of card stock.. but not any card stock.. I used the packaging that came with my stamps because it was so stinkin cute!
 I propped up the main image, the sentiment and the signing area with pop dots/foam dots

I hope you have enjoyed today's tutorial. Thank you Latina Crafters for your support! Have a great day everyone!! Check out our NEW Siphon for the eBrush Here: Siphon Adapter