28.11.14

Sin City Stamps and Cottonwood Arts


Hello! Peggy here to show you a two page journal with a jingle kinda theme...I'm just in that kind of mood lately ya know with the tree an all already up. Haha So, this month we are partnering with Cottonwood Arts. 

B2 Coldpress Notebook (6.75x12)

Molding paste
Stazon blue ink
White gesso
Gelatos 
Water colors
Cardstock
Dictionary paper
Copics
glue or matte medium

The first thing I did was sketch out a santa face so I knew approx. where he would be on both pages. Then I got out my stamps and white gesso. I stamped randomly with my unmounted stamps using gesso as a resist. Next I watercolored a blue background.
I used red gelatos to bring out that resist. More background stamping this time with blue stazon ink.
Time for texture! But before this stage I used dictionary paper for a mustash. Next the molding paste. Like icing a cake! 

 I used copic markers to color his face
 More stamping with white gesso, rolling my stamp over the page with a brick background. And now embellishments with some fussy cutting and glue.


I hope you have enjoyed my goofy side as much as I had fun making it! Thank you to Cottonwoodarts our november sponsor
I hope I have inspired you to create your own goofy side!.
Thank you for joining me! Stamps and Stencils and much more can be found at Sin City Stamps

27.11.14

Easy Christmas Home Decor

Hello! Peggy here to show you how to make these easy Christmas decor table decorations. 
The supplies used today are:
Sharpie Pen metalic gold
cardstock
punch
dictionary pages
Burlap
Glue
shaped Scissors 

I started by opening and cutting a cereal box in half. This gave me two pieces of thin chipboard to work with. I shaped each piece into a cone and trimmed off the bottoms to create a flat bottom.

Below shows the inside ss well as completely tight at the top of the cone.


I cut strips of pattered cardstock, curled the ends and layered them to resemble branches. I glued each piece overlaping slightly so the cone was not visible.

Remember those shaped Scissors well pull them out and give the leaves some texture! I air brushed all leaf tips in metallic gold. It took less than a minute.

Next I punched snowflakes and airbrushed them with a metalic gold sharpie. 

I thought a topper made of dictionary paper would fit my vintage feel. I created two rosettes with an accordian fold. I placed a snowflake in the center and glued the ends and center to create a fanned look. I eBrushed my rosettes in gold metalic sharpies.
That's  it! Assemble and whalla!
I started my second cone by gluing dictionary paper directly to it and trimming the bottom when dry.

I placed a bunch of punched snowflakes sprayed with gold metallic sharpies all over my covered cone.Next I wrapped some burlap around the cone and glued in place.

That's  it!
here is my result.


I hope you have enjoyed todays tutorial. Thank you for joining me today! You can find Craftwell eBrush here. 

18.11.14

Chinese Auction Card

Hello all today I am posting a card for a fun girls only auction. *****Please note profanity below*****
We get together every year for a good cause, sometimes up to 30 of us gals to auction off Christmas wrapped boxes. No one knows what we are bidding on except the ones we wrap ourselves. We each bring two gifts, one nice one gag gift..This year I am putting in a card! Let the jokes and wine commence!

Can't wait to see how much wine I mean money we raise! 

17.11.14

Craftwell Ebrush Christmas Cards


Hello Peggy here, welcome to another tutorial featuring the fabulous Ebrush by Craftwell. Today I am making Christmas Cards.
Todays supplies include:
Ebrush and accessories
Stamps
Versa Mark
Embossing powder
Sharpie Markers
Copic Markers
Gesso
Stickles
Painters tape
Heat tool
Cardstock
Glitter
Clearsnap design adhesive

I started with an 8 1/2 x 11 piece of cardstock folded in half on the long side and cut in half at 4 1/4 giving me to cards. I stamped my image with Versa Mark ink and sprinkled black embossing powder on top, shaking off the excess. I heat set and let cool.


Next i stamped the same image on scrap paper and fussy cut to make a mask to place on top of my image. I used my Ebrush to then create  a background. I started with blue sharpies spraying an even coat down my card.
Then I sprayed a black sharpie on top of the blue to create a dark winters night. I also wanted to simulate some snow, so I used white gesso (you could also use white acrylic paint) and splattered spots while the mask was still on. After my background was created I colored with copic markers leaving just the snow to be covered with Frosted Lace Stickles.
Here is my result

Next I had some cut images I thought would look great on a card.
So I got my Ebrush and sprayed with green and red sharpies. First my berries then the leaves. I used two shades of green for the leaves spraying the lighter color first. I also used dark green on the edges for definition and drew in the center line.

I used a red piece of cardstock for my next card with the same dimensions as the card above.
I used painters tape to create some metalic gold edges. TIP: Get your desired length of tape and stick it to your cloths a couple times to reduce the stickyness as it may rip your paper as you peel it off.

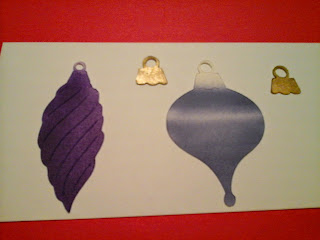
Below I have two paper ornaments and I am crazy for purple so I decided to color them in the same colors as my tree this year. Purple and Gold.
I used my Ebrush with purple sharpies to cover the ornaments and then I added some detail with the gold. On the one on the right I was able to leave a band around the center without masking.
Next I used painters tape to mask off the purple then I sprayed gold metallic in the center. 
Peeling the tape off carefully I now had a perfect stripe. I added dots along the top with my pen and continued to spray the tops.
I stamped a sentiment in versa mark ink and I used a clear embossing powder to create a tone on tone effect and heat set. The only thing left was to assemble. I couldn't have ornaments without a tree so I created a small tree with the help of design adhesives and glitter. Here is my result:
I hope you have enjoyed todays tutorial and I encourage you to try this fabulous must have crafting tool! It's fun and so easy to use!


14.11.14

Sin City Stamps Art Journaling with Terri Sproul

Hello and welcome! Today I made a double page journal using Cottonwood Arts Coldpress Notebook and SinCity Stamps.
Todays supplies include:
Stencils
Dictionary Paper
Molding Paste
Matte Medium 
Watercolor Paints
Lindy's Sprays 
Grey Stazon Ink
Black Stazon Ink
Gesso
Magazine Picture
Cardstock Flower
small lid

This month we are teaming up with a fabulous sponsor Cottonwood Arts. They have produced a line of coldpress journals and notebooks that can handle a large amount of medium for mixed media projects.

Today I am showing a double layout journal page featuring 
I started  with some ripped dictionary pages.  I placed small pieces horizontally and glued them down with Matt medium.
Next I used stencils with some molding paste. I knew roughly where I was going to place my focal image and worked around it.

With Grey Stazon ink  I started stamping with the background images from the Terri Sproul Art Journaling 2 line.
I also wanted these images in white so I used white gesso with my stamps. Keep in mind Gesso is an Acrylic so cleaning your stamps immediately is a must.  I used my finger to apply the gesso directly to my stamp. I used a small lid with white gesso to create  circles.
Next I started laying down some color with watercolors. I got a really cool resist effect when coloring on top of my stamped images.
I glued my focal image of Marilyn down with matte medium being careful not to get any medium anywhere but under my image as it will resist any colors I place on top. I wanted to tone down my colors so I created a wash with water and gesso and covered both pages. Seeing my focal image is black and white I wanted some darker colors. So I brought out my sprays and went to town with green, gold and browns.
More Stamps! Layers, layers, layers! Brick background stamp in black stazon. Next more stamping with gesso. I stamped the background words, I also stamped "My Favorite Things" beside her coffee cup.
I placed a cardstock rose in her hair and I made some of my texture pop by outlining certain elements with a black fine point pen. 
I hope you have enjoyed todays tutorial. I have to say I added alot of water and medium to this coldpress notebook and there was no piling or warping. Very impressed with this fabulous journal/notebook from Cottonwood Arts.
Check out Sin City Stamps for Journaling and crafting needs! Stamps, stencils and more....
Warmly, Peggy Oliver