Time to get back to some clay.... it feels so good in my hands and is a good "stress" reliever for me. I had a "brick" of black Sculpey III and some previous posts (here and here) reminded me of some things I wanted to try.
Using some heart shaped cutters, texture stamps, mica and a bit of wire, some beads, I'd like to share two of the pieces I created during a recent play session.
You'll need:
Sculpey III
Sculpey liquid clay (used as glue)
Sculpey Glaze
Heart Shaped clay cutters
Acrylic roller
Mica Powder(Mixed Media Supplies)
Texture stamps
Wire
Round needle nose pliers
Wire cutters
beads and other pieces for embellishment
Paint brush
Baking tile or pan with aluminum foil
Condition clay according to manufacturer's directions. Using the acrylic roller, roll the clay to approximately 1/4 inch thick. Press the texture stamp into the clay and roll with the roller to get a good impression. Cut with the cutters. Smooth the sides of the clay.
Add beads, gems, embellishments. Use "glue" if needed.
Brush on a little mica as desired.
Optional: Cut 2 pieces of wire about 3 inches long. Create a loop and twist the ends. Repeat with the second piece of wire. Flatten and insert into the clay.
Bake as directed. I generally add about 5 extra minutes to the baking process. When the clay has thoroughly cooled, Apply glaze and let dry for 24 hours. (If you chose not to add the loops, you can glue a flat backed bail to the back of the pendant or a pin back.)
Add additional beads and chain as desired for a necklace.
Thanks for dropping by and hope you'll be creating in your crafting space soon! Please drop by my blog for more creative fun!
Paint, Paper, Mixed Media, Stamps, Stencils, Clay, Mica Powders, Pigment Powders. Texture, Nature, and Color. A Mixed Media Playground.
Showing posts with label #MixedMediaSupplies. Show all posts
13.9.18
27.7.18
Metal Gears Journal Cover
Hello!
Today I would like to tell you how I made this Journal Cover.
Supplies used today are :
THoltz Die Gears
Cardstock
Journal Cover
Inks (distress, versafine black)
Cinnamon
Perfect pearls patina collection
DecoArt Antiquing cream
Gel Medium (any glue will do)
Collage papers
Black marker
Collage papers
Black marker
I cut my gears out first and laid them down to paint.
I used perfect pearls patina silver, green and blue. I dabbed on the powders using a gel medium.
Next, I pulled out some real cinnamon, again using my medium to stick it to the gears. Lastly, I pulled out my mixed media supplies mica powder in copper to add the shiny bits.
I let that dry and started with my journal cover. I collaged some vintage papers/text to my journal cover. Then I got my stamps and stencils out and in black ink, I stamped the chain link fence stamp and used the numbers stencil. Then I took the distress inks and went to town. Firebrick red, Broken China oxide, and Peacock feathers distress inks. Then I used antiquing cream sparingly on the base.
I took a black Pitt pen and made brick like marks randomly.
Then I laid my dried gears and I used double-sided foam tape to prop up some of the gears of the background.
I hope you enjoyed today's tutorial for inspiration for your next steampunk gears journal cover.
Warmly,
Peggy Oliver
Labels:
#journalpages,
#Micapowders,
#MixedMediaSupplies
8.7.18
Summer Butterflies card
A summer butterfly card today
I felt inspired by the many butterflies and dragonflies I have in my yard.
Today I am using
Cardstock
Computer Grafix printable transparent sheets
Copic Markers
double-sided tape
scissors
I printed my stamps onto the plastic sheets and cut out my focal image.
Next, I colored with my alcohol markers on the opposite side that I printed on.
I used V17, BV02, BG15, B26 Copic markers but you could use sharpies too.
I used wet glue for the butterflies and double-sided tape for the layered cardstock.
That's it another quick card!
I hope you all are having a wonderful weekend!
Warmly
Peggy Oliver
20.6.18
where gelli prints and stencils meet
Hi everyone! It's been a crazy few weeks here and crafting time has been limited, but I wanted to share this quick and fun ATC with you.
A couple of months ago I created a whole stack of gelli prints -- and began a journey creating some art in ATC size. I still have a stack of prints, albeit it's a tad bit smaller. So let's start there...
I picked one with a pink, orange and yellow base. The colors remind me some recent sunrises here and even an occasional sunset when the colors are high in the sky.
Select a stencil. My stencil is a new digi from Mixed Media Supplies. I'm so excited to get to share the Alpha stencil. There's also some numerals in the digi and it's created at ATC size for perfect use on these mini-sized canvases.
I got my eBrush out and a Tombow® marker ( which worked well with the colors in my background. Place the stencil as desired and spray. Reposition and spray again
Challenged to use some cardboard for another project, I cut a few hearts and removed a bit of the paper exposing the corrugated layer. I "painted" a light coat of Gesso on the cardboard with a finger and let it dry. Mix a little mica with some water and brush onto the dried Gesso for a bit more color and sheen.
Print and color one of the beautiful butterfly digi stamps from MMS. I used a couple of Tombow markers on the reverse side of the vellum. Add some Glaze to the front of the digi and let dry.
Once everything is dry, arrange as desired on your background and secure in place. If desired, add an appropriate word or phrase to your artwork. Sign, date and frame!
Thanks for stopping by the Mixed Media Supplies bog today.... hope you'll join us again soon and don't forget to nurtured your creative soul as frequently as possible. And if you have a little free time, feel free to stop by my blog for additional ideas and creative endeavors.
Labels:
#Micapowders,
#MixedMediaSupplies,
Mixed Media,
Stencils,
tombow
30.5.18
Love at Home
"There is beauty all around When there's love at home." *
You'll need:Wood Houses in graduated sizes (Fun Stampers Journey)
Digital Journal Pages (Mixed Media Supplies)
Doily stencil
Digital photo editing program (Photo Shop Elements)
Digital cutting machine and software (Sizzix eclips2, eCal2)
American Typewriter (light) Font
Souffle Polymer Clay (Gold)
Modeling Paste
Acrylic Medium (or Gel Medium)
Gesso
Digital paper (This & That Collection from Echo Park)
Foam brush (1 inch)
Glossy Accents or Hot Glue Gun
Craft knife
Scissors
Xyron X with permanent adhesive
Sandpaper
eBrush, TB adapter
Tombow markers
Ink
Prep your wood. Apply a thin coat of Gesso and let dry.
This piece has an oops! I started out doing a transfer and it didn't work out as planned -- so this piece has been sanded and a second light coat of Gesso was added.
Open your photo editing program and open the journal pages you want to use. I created a new file and set the size to the same size as the largest house. Copy and paste a small portion of the desired journal page into the new file as a new layer. Using the Type Tool, create your text. Adjust size if needed. Repeat for the other two houses adjusting the size of the base layer.
Print the papers for the houses on copy paper. Print the digital paper from the Echo Park collection on cardstock (110 lb).
Using the acrylic medium, apply a thin coat to the wood and burnish the journal page prints to the houses. Trim with the craft knife as needed. Let dry.
Using the stencil and the modeling paste stencil on the largest house as desired. You can repeat on the other houses if you'd like. Let the modeling paste dry thoroughly.
With the eBrush, lightly spray some color around the edges of the houses. You'll get some color on the modeling paste, but that is fine.
Using the cutting machine, cut the lettering using American Typewriter as desired. My lettering is just a bit over 1 in high. Apply adhesive to the back of the lettering by using the Xyron X and permanent adhesive. Apply to the houses.
Soften the clay according to manufacturer's direction. Use a texture plate and add a little texture to the clay. Cut in to the heart shape using a cutter or a template. Bake according to the manufacturer's direction. Let cool. Attach the heart using some Glossy Accents or hot glue gun.
Cut some strips from the digital paper. Measure and trim as needed. Using the ink or the eBrush, add a little color along each of the edges to soften the colors just a bit. Using some double stick tape, or glue, apply the "roof" to each house.
Thanks for stopping by the Mixed Media blog today. Have oodles of fun in your creative endeavors! Feel free to drop by my blog for more Mixed Media ideas!
14.5.18
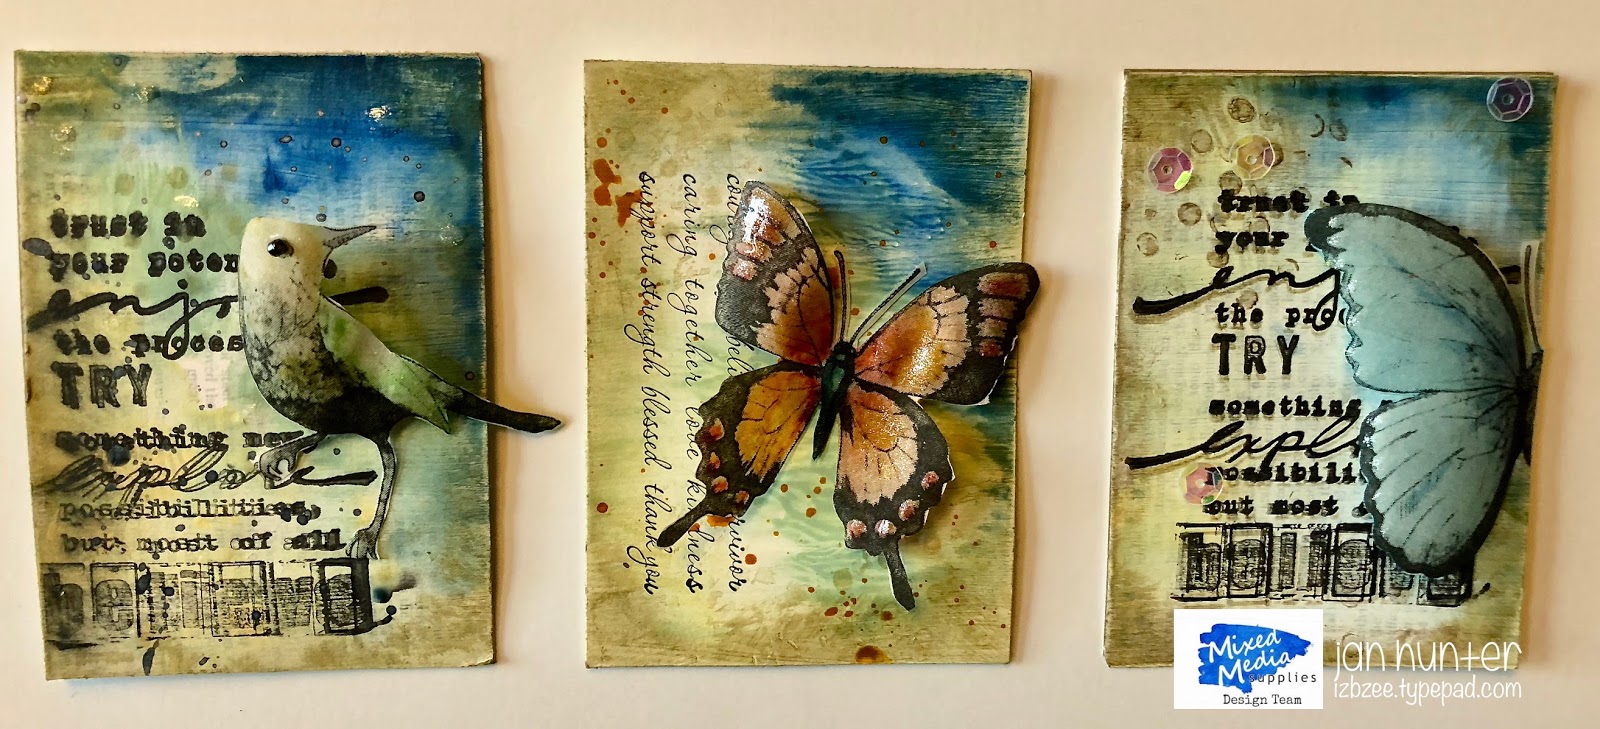
Mixed Media ATCs - adventures in OOPS!
Learning to embrace the oops has always been an issue for me in the past, however, after taking a couple of recent online classes, I have been able to do much better about letting go of some things and let a few of the oops be visible and be a part of the finished project.
Matter of fact - these oops have sort of grown on me.
You'll need
Mixed Media Birds and Butterflies
copy paper
digitized dictionary page
cardstock (white)
vellum
laser printer
Gesso
foam brush
Gelli Plate
Acrylic paint
brush or brayer (optional)
Mister filled with water
Painters Tape
stencil (mini dot - my design)
stamps, (Texture stamps from Mixed Media Supplies, assorted sentiment stamps)
ink pad (black)
Markers (Tombow Dual Brush, SN Sparkle, clear or pearl mica mixed with alcohol or water)
Tape runner (Tombow)
Clear foam Tape (Kool Tak)
seed bead (optional)
Silver, gold mica in misters
Open your favorite photo editing program and size the digital bird and butterflies image as desired. Print using a laser printer. Open the dictionary page and print on copy paper.
Cut the printed dictionary page into ATC sized pieces. Trim as needed if your printer doesn't do a bleed print. The pieces should be a finished size of 2 1/2 x 3 1/2 inches. Using the foam brush, apply a light coat of gesso on the printed side. The print should show through. Set aside to dry.
Print the butterfly page on a sheet of translucent white vellum. Cut the butterflies and birds you will use for your project and set aside.
Section off an area of the Gelli Plate using the printer's tape. The area should be slightly larger than your ATC card.
Place small dabs of acrylic paint on the gelli plate, blend the colors with your fingers (brayer or brush) and lightly mist with some water. Place the gessoed paper face down on the gelli plate and pull a print. Pull a second print. Repeat as needed. Let these pieces dry thoroughly.
Color the reverse side of the butterfly as desired using the markers. The vellum may curl -- you can flatten it by placing it in a heavy book or pressing lightly with a craft iron between two pieces of copy paper. Embellish with some sparkles using the SN sparkle pen. Let dry.
Add a little more texture to the front of your gelli print using a stencil (mini dot) and some ink and a blender or air brush. Stamp the sentiment (I jiggled the stamp - creating my blurred image and the OOPS!) Using the blender and some light brown, add a little color around the edges if desired.
Adhere your print to a piece of cardstock cut to the size of the ATC. Using a blender or the ink pad, add a little more color to the edges of the card.
Mist or fleck the mica on the ATC card as desired, add other embellishments -
Using the clear foam tape, add the fussy cut butterfly and bird images you've colored. Name and sign your finished image.
These are so fun to make and remember, it's ok to embrace the oops! Today's play was definitely a good one.
Labels:
#MixedMediaSupplies,
ATC,
digital stamps,
Mica
25.4.18
Floral Spring Hello
I'm so happy with the way this card turned out. It's simple and highlights a beautiful digital stamp from Mixed Media Supplies.
We celebrated Mom's 86th birthday this month. Alzheimer's isn't kind and we are getting to the point of having to introduce ourselves on occasion. Mom's favorite color is blue and her eyes twinkle a brilliant blue when she smiles. I hope this card will bring a smile and twinkle.
You'll need:
Bouquet digital stamp (Mixed Media Supplies) to be released shortly
Ornamental Frame (digital stash)
Sapphire Mica (Mixed Media Supplies)
Photo editing program (Photo Shop Elements)
Printing program (Print Shop), optional
Printer
Die Cutting machine (Sizzix eclips2) and associated software (eCal2)
Cardstock
Markers (Tombow)
Waterbrush
White embossing powder
heat gun
text background stamp
ink
watercolors
Water brush (#1 or #2)
Tape Runner (Tombow)
Quick dry Glue (LineCo Natural pH)
Embellishments (I used a laser woodcut)
Open your digital photo imaging program. Open the digital stamp and alter the color of the stamp lines by changing hue and saturation. Resize if needed and save. Repeat the process for the ornamental frame of your choice. I altered the frame slightly to accommodate the bouquet. Add the bouquet as an additional layer to the frame. Make any changes needed and save. I saved as a png and as a psd file just in case I wanted to make any additional changes in the future.
Since I'm wanting to make sure that the image will fit in the desired size for my card front and print one additional image, I opened Print Shop and set the page up using the guides for placement of the png image. Print the page when you are satisfied with the arrangement.
I let the ink on my print dry for about 24 hours before starting the watercolor background. I chose a light brown and watered it down significantly before adding it in a pouncing manner around the images on my print.
I used a light turquoise to color in the butterfly. Using a separate print, color the butterfly using a small amount of mica mixed with water. Let dry. Fussy cut the butterfly from the image and set aside.
Open eCal2 and create an oval frame with a cut out that is slightly larger than the outside diameter of the ornamental frame you are using. I added 1/4 inch to the measurements of my frame and created an oval with those measurements and added rectangle and used Back minus Front in the path dropdown to create my card front. Cut using your die cutting machine. (I didn't have a die that had a large enough opening for my image, so the electronic die cutting machine was my best option).
Using the background stamp and a light brown, stamp the oval frame, using some versamark ink, and a flourish stamp, stamp randomly around the frame. Liberally sprinkle the embossing powder to cover all the stamped areas. Remove the excess powder and using the heat gun, set the powder.
Using the eBrush, apply your color by spraying a light coat. Once you've sprayed the frame, gently wipe the excess color away from the embossed images on the frame.
If the mica you mixed with water earlier has dried on your palette, re-charge it with a little more water and using a fine tipped waterbrush and create small dots as desired around the embossed images. Let dry.
Adhere the digital print to the back of the oval frame. Adhere the frame and print (now one piece) to the card front. Using a dot of glue, adhere the butterfly and let dry. Lift the wings a bit for some dimension.
Glue any other embellishments as desired. I chose a "hello" woodcut from my stash. This piece could also be framed. It would make a very nice piece of home decor.
Thanks for dropping by and spending a little time on the MMS blog today. Hope you've scheduled some creative play in this week!
We celebrated Mom's 86th birthday this month. Alzheimer's isn't kind and we are getting to the point of having to introduce ourselves on occasion. Mom's favorite color is blue and her eyes twinkle a brilliant blue when she smiles. I hope this card will bring a smile and twinkle.
You'll need:
Bouquet digital stamp (Mixed Media Supplies) to be released shortly
Ornamental Frame (digital stash)
Sapphire Mica (Mixed Media Supplies)
Photo editing program (Photo Shop Elements)
Printing program (Print Shop), optional
Printer
Die Cutting machine (Sizzix eclips2) and associated software (eCal2)
Cardstock
Markers (Tombow)
Waterbrush
White embossing powder
heat gun
text background stamp
ink
watercolors
Water brush (#1 or #2)
Tape Runner (Tombow)
Quick dry Glue (LineCo Natural pH)
Embellishments (I used a laser woodcut)
Open your digital photo imaging program. Open the digital stamp and alter the color of the stamp lines by changing hue and saturation. Resize if needed and save. Repeat the process for the ornamental frame of your choice. I altered the frame slightly to accommodate the bouquet. Add the bouquet as an additional layer to the frame. Make any changes needed and save. I saved as a png and as a psd file just in case I wanted to make any additional changes in the future.
Since I'm wanting to make sure that the image will fit in the desired size for my card front and print one additional image, I opened Print Shop and set the page up using the guides for placement of the png image. Print the page when you are satisfied with the arrangement.
I let the ink on my print dry for about 24 hours before starting the watercolor background. I chose a light brown and watered it down significantly before adding it in a pouncing manner around the images on my print.
I used a light turquoise to color in the butterfly. Using a separate print, color the butterfly using a small amount of mica mixed with water. Let dry. Fussy cut the butterfly from the image and set aside.
Open eCal2 and create an oval frame with a cut out that is slightly larger than the outside diameter of the ornamental frame you are using. I added 1/4 inch to the measurements of my frame and created an oval with those measurements and added rectangle and used Back minus Front in the path dropdown to create my card front. Cut using your die cutting machine. (I didn't have a die that had a large enough opening for my image, so the electronic die cutting machine was my best option).
Using the background stamp and a light brown, stamp the oval frame, using some versamark ink, and a flourish stamp, stamp randomly around the frame. Liberally sprinkle the embossing powder to cover all the stamped areas. Remove the excess powder and using the heat gun, set the powder.
Using the eBrush, apply your color by spraying a light coat. Once you've sprayed the frame, gently wipe the excess color away from the embossed images on the frame.
If the mica you mixed with water earlier has dried on your palette, re-charge it with a little more water and using a fine tipped waterbrush and create small dots as desired around the embossed images. Let dry.
Adhere the digital print to the back of the oval frame. Adhere the frame and print (now one piece) to the card front. Using a dot of glue, adhere the butterfly and let dry. Lift the wings a bit for some dimension.
Glue any other embellishments as desired. I chose a "hello" woodcut from my stash. This piece could also be framed. It would make a very nice piece of home decor.
Thanks for dropping by and spending a little time on the MMS blog today. Hope you've scheduled some creative play in this week!
11.4.18
Part one of DragonFly Love!
Mixed Media Supplies has some dynamite digital images. You have the opportunity to manipulate them to fit your project. I decided to use the dragonfly image as a digital stamp and wanted to try my hand at designing a base image to be printed out and then used to create a real-time project later. So enter an open source paint program and Mixed Media's imagery! So out comes my tablet and I am playing away with my digi stamp!
I placed each dragonfly on their own layers. Then I colorized the image so I could use some if the color brushes.
I was so afraid to try this... I love it and can't wait to print it out and then add some wondeful paints and textures to this image!!
It is so nice to be able to save this and add to it. I will love showing your the finished project. See you later this month!
What a fun start!
Labels:
#MixedMediaSupplies,
digital stamps,
fun,
image magic
23.3.18
New Egg for Egg Tree
I used some Aleene"s tacky glue for attaching some digital images on my eggshell.
I placed the egg to dry on a skewer.
I then used the airbrush to color the exterior of the egg.
After applying color I then used the Mica Powder to add texture to the exterior of the shell.
I love the way it turned out.
what a wonderful addition to my tree!
Happy Easter to All!
9.3.18
Recycled Card! by Debi Tullier
How many times have you had some leftover printings from a past project? Well, I have boxes of them and wish I had a use for them. I have recolored fabric to sew into new pieces. So I decided with the help of some products from Mixed Media to create a card from this scrap!
First I did a light wash over the letterpress image.
Followed by a scraping of molding paste which I then topped with gold Mica Powder.
I then took a stamp that I had on hand and some distress ink and printed parts of the image on the card.
Next is a digital image from Mixed Media Supply to compliment my arrangement. I also used a gelato stick to add a blue line behind the texture. I used an airbrush to add the visual break to the top quarter of the card front.
Here my card front is attached to my card. I will use it a general card. I finished it off with a gold tempera stick and some wonderful distress ink pad. I hope that you enjoy my work.
Subscribe to:
Posts (Atom)